We often hear about the exorbitant amount of sugar in food and drink these days, and the health risks that are associated with a high sugar intake. But how do scientists quantify the concentration of sugar in various substances? Before the relatively recent invention of sensitive and expensive electronic devices, well, there was beautiful and colorful chemistry!
A History of Sugar Detection Techniques
Sugar is one of the most common ingredients in food. Used in cooking, baking, drinks, and even eaten on its own. Although artificial sweeteners are widely consumed today, there is just no substitute for sugar in many instances! For a variety of reasons, sugar detection is as important today as it was 100 years ago.
Simple as it may sound, detecting and quantifying the amount of sugar in food is no ‘low-calorie’ feat; over the centuries many different detection methods have been developed and improved upon. One of the first tests for sugars was for glucose—the main sugar used by our bodies for energy—proposed in 1841 by German chemist Karl August Trommer1.
Trommer’s Copper (II) Sulfate
His discovery took advantage of the effect glucose has on copper (II) sulfate. This lovely blue compound is known for growing beautiful crystals, which makes it the author’s favorite chemical. Copper sulfate also reacts in basic conditions with glucose, converting it to red copper (I) oxide.
Trommer mixed solutions of copper sulfate and potassium hydroxide (base) and added them to the sugar solution, heating the entire mixture for a few minutes. Trommer’s special reagent was found to either stay blue if no sugar was present or cycle through a rich rainbow to a final red if sugar was present.
However, the preparation of his reagent was time-consuming, and could sometimes react with other substances to give a false positive for sugar!
Fehling’s Reagent
It wasn’t long before another German chemist named Hermann Von Fehling improved further on the cumbersome preparation of Trommer’s reagent, adding sodium potassium tartrate to stabilize the copper sulfate2. This allowed for quicker preparation of the now Fehling’s reagent, and greater selectivity towards sugars rather than other substances that could be present.
Selectivity was always a key aspect of this test, as back then the motivation for their development was to test for glucose in the urine of diabetes patients. Urine contains many other reactive chemicals that gave false positives, which made it difficult to differentiate to diagnose mild diabetes when no diabetes gave similar results!
While Fehling’s reagent worked pretty well in this regard, it was still a hassle to make though as the solutions needed to be freshly mixed. But it wasn’t until 50 years later—in 1907—that Stanley Rossiter Benedict entered the scene.

Benedict’s Test
Still taught in schools across the world to this day, Benedict’s test is the method of choice for quick chemical detection of sugars. Still based off copper sulfate, the recipe for Benedict’s reagent calls upon the help of the atypical reagents sodium citrate and sodium carbonate3.
These two helpers substantially increase the stability of the copper sulfate, allowing the whole solution to have a shelf life ranging from several months to years. All this while improving specificity to sugars, a huge improvement over the previous reagents!
Great as Benedict’s test may seem, it is still not entirely reliable; the results can sometimes be quite open for interpretation. The chemicals do work a treat though, the byproduct of their ‘hard work’ being all the lovely colors present—amounts of red mixed in with the blue.
Though these reagents may seem unreliable and inconvenient to test for just sugar, remember that the original method of testing for sugars in diabetic patients was for the doctor to taste their urine themselves… and you thought your job was bad4!
Laboratory Preparation
Now, let’s head into the demonstration to see how we can actually do this at home! As always, safety first. The team recommends reading the risk assessment below if you plan on repeating the demonstration yourself.
Risk Assessment
| Substance | Hazard information |
| Sodium carbonate (Known as soda ash, used as washing soda/ approved food additive, E500) | Irritant Causes serious eye irritation. Anhydrous solid presents a bigger risk because it is finely powdered, whereas the hydrate is crystalline (usually large crystals)5. |
| Copper (II) sulfate pentahydrate | Corrosive/Irritant/Damaging to Environment Solids and solutions: skin irritant; causes serious eye damage; harmful if swallowed. Solid is very toxic to aquatic life6. |
| Sodium citrate (Approved food additive, E331) | Low Hazard7 |
| Benedict’s reagent | Irritant Contains slightly-alkaline 0.07M copper sulfate solution. Irritant to skin and eyes. Some risk of spitting when heating test tubes8. |
The Author’s Personal Safety Notes
- Gloves and goggles should always be worn when handling chemicals to protect your sensitive eyes and skin.
- Copper(II) sulfate (including Benedict’s reagent) is harmful to swallow and is irritating to the eyes. If in contact with eyes, immediately wash them for at least 10 minutes. Prolonged contact is certainly not good, but from experience, if you get this on your skin it is hardly dangerous if washed off immediately with water. Water usually solves the issue unless it gets on your hair or nails which will stain it blue, only being removed by cutting the offending nail or hair (it clings to protein).
Making Benedict’s Reagent
Benedict’s reagent is very simple to make. It is a mixture of three chemicals dissolved in water. For 100ml of Benedict’s reagent, weigh:
– 1.73g of Copper(II) Sulfate (Pentahydrate)
– 17.30g of Sodium Citrate (Pentahydrate)
– 10.00g of Sodium Carbonate (Anhydrous)3


We recommend a glass stirring rod to agitate the solution to get everything dissolved to the best of your ability. If you happen to have one though, a hotplate that has a magnetic stirring function built-in can be used for automated stirring. Handy! Try not to use a metal spatula, as the copper sulfate will react with the metal, etching the surface and leaving it copper plated.
Don’t worry if the solution does not completely go clear though as copper sulfate tends to come with many insoluble impurities. A quick gravity filtration through some filter paper should clear it right up no problem!


And there you go, 100ml of beautiful crystal clear blue Benedict’s reagent.
Demonstration: Using Benedict’s Solution to Test Household Foods for the Presence of Sugar
Now that we actually have Benedict’s reagent, let’s prepare four glass test tubes of various foods we want to test for sugar. Any solid foods must be ground with a mortar and pestle with added water to form a ‘soup’ first. For variation, we will use:
– 4ml of Milk
– 4ml of Chicken solution
– 4ml of Bread solution
– 4ml of Orange juice

Next, an equal volume (4ml) of Benedict’s solution should be measured out in an appropriate glass measuring cylinder and transferred into each test tube.

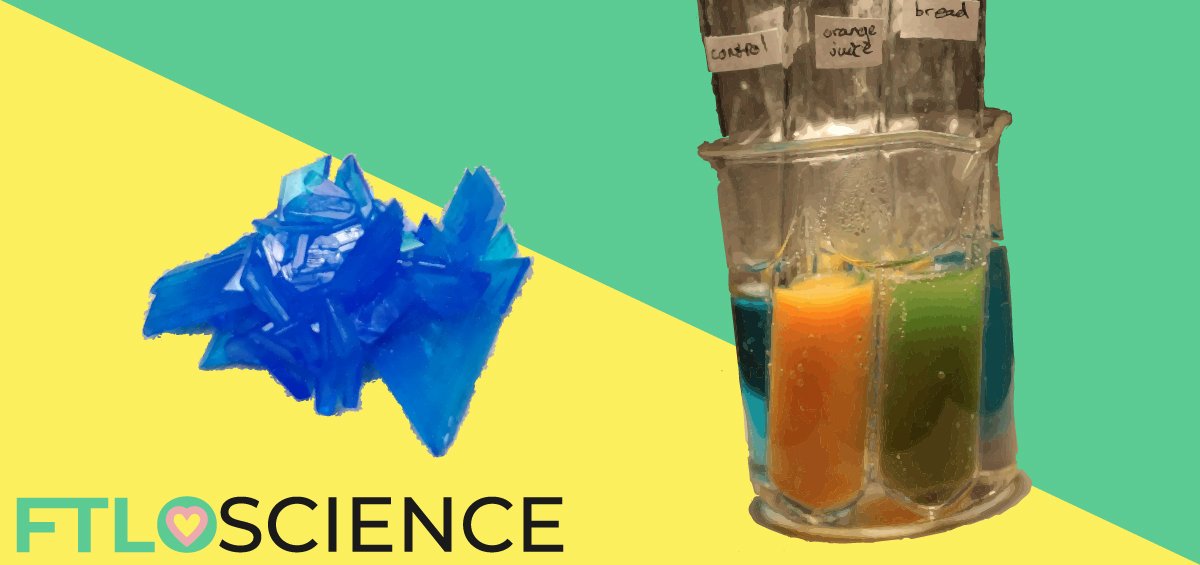
The four test tubes were placed in a 100ml glass beaker water bath along with a fifth test tube acting as a control containing just distilled water. The beaker was heated on the hotplate until the water bath was boiling and was left for 5 minutes9.
Over this time period, the photos below were taken, showing the progression of the color changes of the control, orange juice and bread over the 5 minute period.


Notice how the colors have linked up to what one would probably predict. The control stayed blue of course, but so did the chicken, showing how meat such as chicken is lacking in sugar completely, having high protein levels instead.
Bread does contain small quantities of sugar, either added or naturally from the flour and so we see a green color conveying a small amount of sugar.
The orange juice converted the starting green color to bright orange at the end, showing a high presence of sugar (fruits contain high levels of fructose).
The milk ends up snatching victory for the highest sugar level, converting from a starting dark blue to a finishing bright orange (milk contains high levels of lactose).
Reducing Sugars and Jargon Busting
So far, we have avoided the term ‘reducing sugars’ by replacing it with ‘sugars’, but technically Benedict’s test only responds to reducing sugars. Reducing sugars are, well, sugars that act as reducing agents. They donate electrons to another compound, causing that compound to be reduced. Due to it having lost electrons, the sugar ends up being oxidized.
β-D-Glucose and Monosaccharides
β-D-Glucose (more commonly known as dextrose) is a reducing sugar. It is a naturally occurring sugar that wins the prize for your body’s main energy source with your brain particularly loving the stuff, using 50% of the body’s total sugar energy in the form of dextrose10.

The more technical term for sugars is saccharides. The above dextrose molecule consists of one carbon ring, therefore is a mono-saccharide11. All monosaccharides act as reducing sugars as the carbon ring can be easily opened up to reveal a reactive group called an aldehyde.
Disaccharides
Following this logic, sugars that consist of two carbon rings are known as di-saccharides. Only certain disaccharides act as reducing sugars as these squished together carbon rings form stronger bonds that may remove its ability to ‘open up’ to reveal its aldehyde group. Bummer.

The two carbon rings fused together in sucrose are actually β-D-Glucose (that we’re familiar with) and fructose. You get a cookie if you noticed that the left ring looked familiar!
Since it is a non-reducing sugar, it won’t react with Benedict’s reagent. The solution, therefore, stays blue showing a negative result. Therefore when testing for the presence of sugars, it is important to have an idea of whether it is a reducing sugar or a non-reducing sugar. Benedict’s test will show no sugar present even if non-reducing sugars are present; pesky molecules!
Other disaccharides such as lactose are reducing sugars where the chemical bonds don’t interrupt the ability of the carbon rings to open up to form aldehyde groups. Lactose is the main sugar in milk hence why it turned orange in the previous demonstration.
If you haven’t caught on, if a chemical name ends in -ose, it’s probably a sugar.
Correlating Color with Sugar Concentration
Benedict’s reagent is actually semi-qualitative as it has the ability to form different colors based on the concentration of reducing sugars. Green indicates about 0.5% reducing sugar concentration; yellow indicates 1%; orange 1.5% and red 2% or higher.
To demonstrate this, four such standard solutions were prepared. These standard solutions had exact concentrations of dextrose at 0.5%, 1.0%, 1.5%, and 2.0%. 4ml of each standard solution was added to their respective labeled test tubes.


Repeating the earlier demonstration setup, the four test tubes were added to a 100ml glass beaker water bath along with a fifth test tube acting as a control (distilled water). The beaker was heated on a hotplate until the water was boiling, at which point it was left for 5 minutes. But! The demonstration failed as they all went red (apart from the control obviously).
Well, it’s not chemistry without a few failures, right? This is why if your experiments go wrong at school you shouldn’t beat yourself up about it; atoms are temperamental things!
In the end, I cheated a little and replaced the 4ml of each standard solution with 2ml of each standard solution topped up with 2ml of distilled water. Sneaky. This seemed to yield the expected color change:

While both demonstrations were quite crude, by being more meticulous and with a little luck, the colors of the foods tested can be compared to standard solutions like these.
For instance, the bread went green, but this was after mashing a small piece up in lots of water which probably diluted the 3% sugar concentration nearer to 0.5%, which can be matched with the ‘0.5%’ standard solution just above that turned a similar shade of green. This is just a proof of concept, but a colorful one!
The idea of Benedict’s test being semi-qualitative can actually be pushed further into being quantitative, that is, a test that provides numerical data. A piece of equipment known as a colorimeter can be deployed that can measure the absorbance of light in a solution which can then be linked to the sugar concentration12.
Saying something is blue for a negative result and red for a positive result, which we did at the beginning, is qualitative. Saying something is ‘green = ~0.5% sugar’ or ‘red = ~2% sugar’, which we just did, is semi-qualitative. The colorimeter can relate colors to exact concentrations after being calibrated, so is quantitative.
Many High Schools and Colleges have a colorimeter in use, so if you are a chemistry or biology student you will probably get the chance to test it out yourself!
What About Non-Reducing Sugars?
Yes, sucrose is a non-reducing sugar and will not react to Benedict’s reagent due to its lack of any reactive aldehyde groups to reduce blue copper (II) sulfate into red copper (I) oxide. Although if anybody knows how to ‘cheat’, it’s going to be a sneaky chemist!
Due to the strong chemical bonds between sucrose’s two carbon rings preventing the formation of aldehyde groups, dilute hydrochloric acid can be added to the sugar solution and heated. Hydrochloric acid catalyzes the breakdown of sucrose, causing it to react with a water molecule and breaking the bonds between the rings to form separate dextrose and fructose molecules9.


These dextrose and fructose molecules are monosaccharides, and therefore reducing sugars as we discussed earlier; they will respond to Benedict’s Reagent. Due to a water molecule reactant and the splitting nature of the reaction, the sucrose is said to undergo hydrolysis. Add that to the list of scientific gibberish that you’ve learned today!
Using Benedict’s Test for Non-Reducing Sugars
For our last demonstration, 4ml of a standard solution of 2% sucrose was added to two test tubes. In one of the test tubes, a single drop of concentrated 32% hydrochloric acid was added.

The two test tubes were then added to our famous beaker water bath along with the distilled water control. As with the other demonstrations, the water was brought to a boil and left for 5 minutes.

They were then taken out and 4ml of Benedict’s reagent was added to each. Slight fizzing might be witnessed in the sucrose + hydrochloric acid test tube as the acid can react with the sodium carbonate in Benedict’s reagent, producing carbon dioxide gas. This is nothing to worry about.

The test tubes were subsequently added back to the beaker water bath which was still hot, and the color change unexpectedly began almost immediately:


The sucrose solution without hydrochloric acid stayed the exact same color as the control solution, as expected; the negative result shows no reducing sugars were present. The sucrose solution which was boiled with hydrochloric acid turned a bright red, the positive result indicating the presence of reducing sugars.
Using the information provided we can conclude that a non-reducing sugar was present in high concentrations at 2% or higher. Nothing like a good bit of chemist detective work!
Although now largely replaced with electronic equipment boasting better accuracy and speed, Benedict’s test and its predecessors provided powerful tools for scoping the biochemical world of sugars, initially used to diagnose diabetes mellitus and therefore saving many lives. The history is as fascinating as the colors are vibrant.
Still today Benedict’s test for reducing sugars can be appreciated as an excellent chemical qualitative—and even semi-quantitative—test for sugars, acting as a fantastic induction to the universal carbohydrate chemistry it encompasses.
This article was written by Samuel Hutchins-Daff.
Author’s Note: I hope you learned something interesting today and gained a little appreciation for this tried and tested chemistry demonstration, it would make my day if you did! If you have any further questions don’t hesitate to drop us an email here!
Reference
- Robert Tattersall (2009). “Diabetes: The Biography”. Oxford: Oxford University Press, p.19.
- H. Fehling (1849). “Die quantitative Bestimmung von Zucker und Stärkmehl mittelst Kupfervitriol” [The quantitative determination of sugar and starch by means of copper sulfate]. Annalen der Chemie und Pharmacie. pp.106-113.
- Benedict, S. R.7 (1 January 1909). “A Reagent For the Detection of Reducing Sugars” (PDF). J. Biol. Chem. 5 (6): 485-487.
- Jackie Rosenhek (September 2005). Doctor’s Review: Liquid Gold. [ONLINE] [Accessed 19 September 2018].
- “Student Safety Sheets, 2nd Edition, 2018”. CLEAPSS. p.25.
- Ibid. p.32.
- F.Spaeth (24 September 2008). Colonial Chemical Solutions, Inc.: Material Safety Data Sheet – Sodium Citrate. [ONLINE] [Accessed 19 September 2018].
- “Student Safety Sheets, 2nd Edition, 2018”. CLEAPSS. p.6.
- Locke, J., Bircher, P. and Fullick, A. (2015). “A Level Biology A for OCR Year 1 and AS Student Book”. 1st ed. Oxford: Oxford University Press, p.51.
- Scott Edwards (2016). Harvard Medical School, Department of Neurobiology: Sugar and the Brain. [ONLINE] [Accessed 19 September 2018].
- Locke, J., Bircher, P. and Fullick, A. (2015). “A Level Biology A for OCR Year 1 and AS Student Book”. 1st ed. Oxford: Oxford University Press, p.46.
- Ibid. p.52.
About the Author

This article was written by a contributor. For a full list of guest writers, click here.